SHRED YOUR CHEESE AHEAD OF TIME
It's often cheaper to buy large blocks of cheese and chunk cheese has better flavor and texture than the pre-shredded kind. If I'm going to be using cheese several times in the same week, I'll divide the chunk into recipe size portions and shred them in my food processor all on the same day. I wrap each portion of cheese in plastic wrap, dump it into a zipper bag and insert a note with the quantity and recipe I'll be using it in. If I end up with extra cheese, I'll wrap it the same way and freeze it for later. Now I've got freshly shredded cheese and only had to dirty my food processor once.
MAKE YOUR OWN PRE-WASHED BAGGED LETTUCE
I don't care for the pre-washed bagged salad mixtures. To me they taste half rotten and only last a day or so before having to be thrown out. I buy fresh leaf lettuce then, when I get home from the store, I wrap it unwashed in a linen towel and put it in a plastic bag. Every couple days, I take off enough leaves for about 2 days worth of salad, wash and spin them in my salad spinner until as dry as possible, then put them in a gallon size zipper bag between two sheets of paper towels. The lettuce stays fresh tasting this way for 2-3 days at least.
BROWN YOUR MEAT AHEAD OF TIME
This tip is similar to the cheese grating tip. If I'm going to dirty a frying pan anyway, I will brown whatever hamburger or bulk sausage I will need for the week in batches. I then put it in either zipper bags (cool first) or plastic storage containers and label with the quantity and recipe it will be used in.
NO OILY SPRAY MESS
Do you find that when you spray non-stick cooking spray on your baking pans, it tends to get all over your counter or sink or anything in the surrounding area? If the dishes in your dishwasher are dirty, just open the door, hold the baking pan in front of the opening and spray towards the open dishwasher. Any stray mist will end up on the already dirty dishes.
GRILL EXTRA CHICKEN OR BURGERS
If I'm going to be using my counter top contact grill (George Foreman, GE, etc.) to grill boneless chicken breasts or hamburger patties, I will often grill a few extra and freeze them for future meals. Why clean your grill more often than you have to? You could also do this with your outdoor grill.
FREEZER TIP
I like to keep small storage bags of the following things on hand in the freezer. This is a good way to use up veggies that will go bad before you have a chance to use them up, little bits of leftover meats, and other things. They come in very handy when making omelets and other dishes as well as when making a recipe that calls for a very small amount of some ingredient.
Whenever I need to use bell peppers in recipes, I chop off the tops and bottoms. I chop those, spread them on a baking sheet and freeze them. Once they're frozen, I store them in a zipper bag in the freezer to use on pizzas and in casseroles, etc.
- Chopped green and red peppers
- Chopped jalapeno and other hot peppers
- Diced, raw or crisp-cooked bacon
- Diced ham
- Crumbled, cooked breakfast sausage (nice to add to eggs in the morning)
- Crumbled, cooked Italian sausage (good on pizza)
- Crumbled, cooked ground beef
- Diced, cooked chicken
- Cooked, diced roast beef or pork
- Chopped onions
- Sliced mushrooms
- Chopped celery
- Chopped leeks
- Chopped green onions
- Cilantro (wash, dry well and chop)
- Parsley (wash, dry well and chop)
- Spoonfuls of tomato paste, individually frozen
- Lemon or lime juice (freeze in ice cube trays, then store in plastic bag)
- Lemon, orange or lime peel (peel in large pieces, then chop frozen, as needed)
- Nuts
- Sesame seeds
- Sunflower kernels
- Berries such as strawberries, blueberries and raspberries
STORING CUCUMBER FOR SALADS
When I buy a cucumber to use in salads, I'll chop off one end, then peel about an inch or so of the skin off that end. I cover the exposed end with a piece of plastic wrap and secure it with a small rubber band. This keeps the rest of the cucumber fresh until I need to peel a bit more.
ONION SIZES
This is not really a time saving tip, but more of a warning about using onions in your low carb cooking. Onions can add great flavor to your food, but they are quite high in carbs. Fortunately, a little bit of onion goes a long way. When I visited the USDA site to get the carb count for onions, I was surprised to find that what I considered a large onion was in fact what they call a small onion. It's not easy to find tiny onions where I shop. The most common is about the size of a grapefruit! That's extreme, but I always assumed that a large onion was somewhere around the size of a softball. That is until I took the time to weigh one. To remove any confusion as to what the various sizes of onions look like, I've come up with the following as a guideline:
- Small onion, 70 grams or 2.5 ounces (6 net carbs) - about the size of a golf ball or about 1 3/4 inches in diameter.
- Medium onion, 110 grams or 4 ounces (9.5 net carbs) - about the size of a tennis ball or 2 1/2 inches in diameter.
- Large onion, 150 grams or 5.25 ounces (13 net carbs) - approximately the size of an 8 ounce can of tomato sauce, minus the corners and would easily fit inside a 1/2 cup measuring cup whole and unpeeled.
- Extra large onion, 340 grams or 12 ounces (20 net carbs) - about the size of a softball or 3 1/2-4 inches in diameter.
- Jumbo onion, 510 grams or 1 pound 2 ounces (32 net carbs) - about the size of a grapefruit or 4 1/2 inches in diameter.
KEEPING CELERY FRESH
I'd read over and over that storing celery wrapped in aluminum foil would keep it fresh longer. I doubted that it would really make a difference and never got around to trying it until recently. I have to say that it really does keep it fresh a lot longer! Remove the celery from its wrapper and completely enclose in a large piece of wide heavy duty foil. It will make the difference between celery that spoils within a few days or lasts a couple weeks or possibly longer. If your celery is too long to fit crosswise on the foil, place it diagonally from corner to corner on a square of foil. Roll it up then fold the corners over each end.
KEEP IT CHUNKY
Because we don't have the additional bulk of rice or pasta in many of our low carb dishes, I find that it helps to fool myself into thinking I'm eating a more substantial dish or sauce if I keep the ingredients a little bit chunky. For example, when I make egg salad, I don't finely chop the eggs. I cut them into bite-sized pieces. I do the same when I brown hamburger for chili, casseroles or tomato sauces. I don't break the pieces down too small, but not quite the size of meatballs. This gives you a bit more to chew on.
WORKING WITH UNFLAVORED GELATIN
EASY TO MEASURE BUTTER
HOW TO ROAST CHILES AND BELL PEPPERS
If you use Anaheim or New Mexican Hatch chiles, they can be chopped and used just like the mild green chiles that come in those little 4 ounce cans. You'll probably need 2 chiles to equal one can. There won't be any salt added so you may have to adjust your recipe a little. If kept whole, these will work well in my Chile Relleno Casserole. You'll need about 8 good-sized Anaheim chiles for the recipe. This method works just as well with red bell peppers.
UPDATE:
For chiles that are to be stuffed, cut around the "collar" of the chiles with a sharp knife and pull out the stem. This should pull out the core and most of the seeds along with it. You can use your finger to scrape out any seeds that got left behind. Roast and peel them as directed above. The nice thing about this method is that you'll have a hole at the top of the chile perfect for putting in the stuffing.
I also came up with a way to keep the chiles from rolling around on the baking sheet. I placed the "V" rack from my turkey roaster on the baking sheet and lined it with foil. The rack and the foil help keep the chiles in the proper position. Also, by placing them with their large ends toward the center of the rack, it keeps them level rather than having that end sticking up much closer to the broiler element than the tapered ends. I did have to keep the oven rack in the normal baking position in the oven so that the chiles wouldn't be too close to the heat. Click here to see a photo of my "chile roasting rack".
LINING BAKING PANS WITH FOIL
WORKING WITH XANTHAN GUM
If your recipe doesn't call for xanthan gum, and you'd like to add a little, start with only 1/8 teaspoon then wait a minute or so to see the results before adding more an 1/8 teaspoon at a time. As far as cleanup goes, you don't want to rinse your measuring spoon with water. You'll end up with sticky slime that's very difficult to clean off the spoon as well as your hands. Instead, take a dry Kleenex or napkin and brush the powder off the spoon.
UPDATE: Thanks to ravenrose at Low Carb Friends, there is a new, easier way to blend xanthan gum into liquid with no fear of getting lumps. Before adding the xanthan gum to your sauce, mix it with an equal amount of oil in a small dish. The xanthan gum will dissolve instantly in the oil and your sauce will be lump-free. I suggest mixing up a little more of the mixture than you think you might need and add it to the simmering sauce gradually until thickened as desired. Generally, 1/4 to 1/2 teaspoon of xanthan gum is all that is needed for most sauces.
STORING FRESH MUSHROOMS
MICROWAVE POTPOURRI
MINI PIZZA PAN
MICROPLANE ZESTER TIP
MEASURING PORK RINDS TO USE IN RECIPES
DRAINING FROZEN SPINACH
QUICK WAY TO REMOVE THE FAT FROM PAN DRIPPINGS
MAKING "TRISHZ" LIQUID SPLENDA FROM SWEETZFREE
1. Put 2 teaspoons Sweetzfree in a measuring cup.
MAKING MILK OUT OF HEAVY CREAM
If your recipe says to soften the gelatin by sprinkling it over cold water, I've found that the most effective way to do that, and prevent lumps, is to put the required liquid in a shallow bowl, about the size of a soup bowl. This gives more surface area for the powder to come in contact with the liquid. What I do is very lightly and evenly dust the powder over the whole surface of the liquid. As you see it become moist-looking, continue to sprinkle over another layer until the whole packet is used up. Let stand for about 5 minutes to fully absorb the liquid. I also suggest not using a store brand of unflavored gelatin. I had a lot of trouble with Kroger brand clumping into globs that never did dissolve in hot liquid later. I recommend using Knox brand.
I like to keep a stick of butter in my Rubbermaid butter keeper. To make it easy to accurately measure out tablespoons at at time for recipes, I do this simple trick that I read somewhere. Before removing the paper wrapper, take the dull edge of a butter knife and lightly score along each of the tablespoon markings on the label. Now, when you remove the wrapper, you will easily see where to cut in exactly 1 tablespoon increments.
I've come up with a much easier way to roast chiles. It can be a pain in the neck to remove the seeds from the chiles after they've been roasted so I decided to try removing them before roasting. For chiles that you're going to chop up after roasting, just slice them in half lengthwise and scrape out the seeds and membranes. Place the chiles skin side up on the baking sheet then roast and peel them as directed above. There is no need to turn them.
When you need to line a baking pan with aluminum foil, you can easily get the foil to fit the shape of the pan by turning the pan upside-down and using it like a mold. Take a sheet of foil large enough to cover the bottom of the pan plus a bit for overhang. Use your hands to mold the foil to the shape of the upside-down pan by pressing firmly against all sides of the pan and smoothing the foil to fit snuggly. Turn the pan back over and insert the molded foil. You just need to push the foil into the corners a bit and fold the excess over the edge of the pan.
A little xanthan gum works great to thicken sauces and puddings, but can turn gummy if not added properly. What works best for me is to put what I need in a measuring spoon and, with one hand, very lightly sprinkle it over the surface of my sauce while briskly whisking it in with my other hand. I add it as gradually as I can. Ideally, sprinkling it from a shaker jar would be the best way to go, but I have to measure mine when I'm testing recipes. Xanthan gum is more likely to clump if you add it too quickly to liquids. I've had very good luck sprinkling it a bit more liberally over the surface of more solid foods like chili or stir-fries. I find that I don't need to be quite as careful in those cases.
I only shop once a week for groceries and often buy a full pound of fresh mushrooms to use in several recipes over the course of the week. I find that if I keep them in the original container, they turn slimey after just a couple days. What I do now is divide them up into the portions I'll need per recipe and store them in paper lunch bags in the fridge. I write the name of the recipe I'll be using them in on the outside of each bag. I've kept them as long as a week this way and they were still dry.
Here's a tip for getting rid of odors in your microwave such as you get when you cook bacon or other "fragrant" foods. Fill a 2-cup glass measuring cup about half full of water and sprinkle in a little cinnamon and/or cloves or allspice, etc. Place in microwave and bring to a boil, watching closely so that it doesn't boil over. Remove from microwave and discard the water. The spices will cover up the unpleasant cooking odors.
When the latch on one of my springform pans broke and became useless, I saved the metal base. It makes a nice little pizza pan for baking an individual pizza. If you like to make low carb crepes, you can stack them on a springform pan base, with wax paper between them, and put the whole thing in a plastic bag and freeze them. The base will keep them from getting crushed in the freezer.
Here's a tip that I got while watching Good Eats on Food Network. Alton Brown took the protective plastic sleeve and slid it onto the zester backwards so that what he was grating would be caught inside the sleeve. He then slid off the sleeve and dumped the food into his bowl. I tried it the other day while grating some lemon peel and it worked great. No more grated lemon rind all over the counter! Click here to see what a Microplane zester looks like.
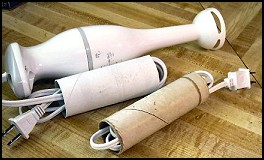
CORD CADDY
I got this idea from my Grandma. Save your old toilet tissue and paper towel tubes and use them to keep your appliance cords under control. As you can see in the photo, I've used them for my stick blender and the cord to my electric mixer.
If you don't have a kitchen scale, 3-4 ounces of finely ground pork rinds measure out to about 1 to 1 1/4 cups. Figure 1/4 cup for each 1/2 ounce called for in the recipe.
I got this idea from Cook's Country magazine. Thaw your spinach in its original box and wrapping. Snip one corner off the box with scissors. Be careful not to make too big of a hole that the spinach can come out. Now hold the box over the kitchen sink with the hole facing downward and squeeze the heck out of the box to get the water out. I found that I needed to twist the box a bit to get it all out.
Here's another tip from Cook's Country magazine. Pour your pan drippings into a big glass measuring cup, let stand about 5 minutes to allow some of the fat to go to the surface. Add several ice cubes and let them stand for about 5 minutes. When you scoop out the ice cubes, most of the fat will come out with them. One problem is how to dispose of the greasy ice cubes since you can't just put them down the sink. I always keep an old coffee can in my fridge to put grease that I drain off ground beef, etc., so I dumped the cubes into that can.
If you've used both Sweetzfree and TrishZ's versions of liquid Splenda, you'll know that Sweetzfree is a lot more concentrated. That's not usually a problem unless you need the equivalent of a tablespoon or less of sugar. There's no way to measure out half a drop of Sweetzfree and an extra drop can make a huge difference in the sweetness. So, I've come up with a formula for making my own "TrishZ" liquid Splenda out of Sweetzfree. I store it in an old squeeze bottle and mostly use it to sweeten my tea and coffee. Here's the formula:
2. Add enough distilled water to fill it to the 1/4 cup line.
3. Using a small funnel, pour this into a small bottle and shake well.
What do you do when you have a recipe that calls for milk or when you want something to pour over your low carb breakfast cereal? Most low carb cooks use a mixture of half heavy cream and half water. This works very well, but is quite high in calories and fat compared to milk. If calories and fat are a concern for you, I've found that you can cut back on the cream and still end up with an acceptable "milk". You won't get quite the body and flavor that milk has, but with just 2 tablespoons of cream per cup of "milk", it will still have a rich, cream flavor, the calories will be drastically reduced and it should work fine in many recipes. Here are the counts for various milk formulas:
|
1 CUP WHOLE MILK
146 calories 8 grams fat 11 carbs |
1 CUP HEAVY CREAM
821 calories 88 grams fat 6.5 carbs |
1/2 CUP CREAM + 1/2 CUP WATER
411 calories 44 grams fat 3.5 carbs |
1/4 CUP CREAM + 3/4 CUP WATER
206 calories 22 grams fat 1.5 carbs |
1 OUNCE CREAM + 7 OZ WATER
103 calories 11 grams fat 1 carb |
WORKING WITH FRESH LIMES AND ZEST
You'll get about 2 tablespoons of juice and about 1 tablespoon of zest (1 gram) from one average size lime.
GARBAGE BAG TIP
Rachael Ray always keeps a "garbage bowl" handy on the counter as she does her cooking. It's a great idea but I'd rather not have another bowl to wash when I'm done. I keep a stash of old plastic grocery bags in my pantry. When I'm prepping ingredients for cooking, I spread a bag out on the counter and pile the vegetable peelings, etc. onto the bag. When I'm done, I just wad up the bag of scraps and toss it in the trash.
MAKE YOUR OWN COCONUT FLOUR
You can make your own coconut flour to use in low carb baked goods in place of some of the nut flour called for. However, this is not a substitute for commercial coconut flour which has had the fat removed. Homemade coconut flour is very moist and won't soak up liquid like commercial coconut flour will. The best part is that it's much lower in carbs than the store bought kind. To make it, simply run unsweetened coconut through a coffee grinder until very fine.
To get 3/4 cup of coconut flour, you'll need to grind 2 1/2 ounces of coconut or about 1 1/4 cups. For 1/3 cup flour, start with 1 ounce or 1/2 cup. Here is a carb comparison between the homemade kind and the commercial kind:
1 ounce commercial coconut flour (Aloha Nu): 126 Calories; 4g Fat (30.5% calories from fat); 5g Protein; 17g Carbohydrate; 11g Dietary Fiber; 6g Net Carbs
1 ounce unsweetened coconut: 264 Calories; 26g Fat (86.3% calories from fat); 3g Protein; 7g Carbohydrate; 5g Dietary Fiber; 2g Net Carbs
DICED COOKED CHICKEN FOR RECIPES
An easy way to get roasted chicken to use in casseroles without a lot of fuss is to buy skinless, boneless chicken thighs. They quite often have them at a reasonable price these days. Season about 3 pounds of boneless thighs (9-10 pieces) with the seasoning of your choice. Place in a foil-lined 9x13" cake pan or roasting pan. Bake at 425ş for 25-25 minutes or until the chicken is cooked through. Let cool about 30 minutes then chop as needed for your recipe. I got about 5 cups of cubed chicken from 3 pounds of thighs.